

With an Apache web server and an EC2 instance, hosting a website on AWS is simple. This tutorial will show you how to install Apache, run an EC2 instance, and host a simple webpage step-by-step.
Step 1: Launch an EC2 instance
- Go to AWS management console and click on EC2 Instances
- First you have to select region where you want to deploy your application like us-east-1
- Click Launch Instance
- Name and Tag : XXXXXXXXX
- AMI: Amazon Linux 2
- Instance Type: t2.micro [ Free Tier eligible ]
- Create Keypair
- Network Setting: Leave as Default
- Make sure enable public IP
- Firewall security groups: Check SSH port 22 , HTTP port 80 and HTTPS port 443
- Storage: 20 gp2
- Click Launch Instances
Step 2: Connect to your EC2 Instance
- Copy the Public IP of your EC2 Instance
- Open your Terminal or command Prompt and connect via SSH
ssh -i your-key.pem ec2-user@your-instance-public-ipNote: If you are using ubuntu server then use ubuntu@your-instance-public-ip instead of ec2-user
Step 3: Install Apache webserver
- First of all update your system
- For Amazon Linux [Httpd]
sudo yum update -y- For Ubuntu Linux [ Apache2]
sudo apt-get update -y 2. Install Apache webserver
- For Amazon Linux
sudo yum install -y httpd- For Ubuntu Linux
sudo apt-get install apache2 -y3. Start Apache service and enable it
- For Amazon Linux
sudo systemctl start httpd
sudo systemctl enable httpd- For Ubuntu Linux
sudo systemctl start apache2
sudo systemctl enable apache2
Step 4: Verify default Apache webserver
- After install the Apache webserver
- Copy the public IP of EC2 instance and paste it in browser
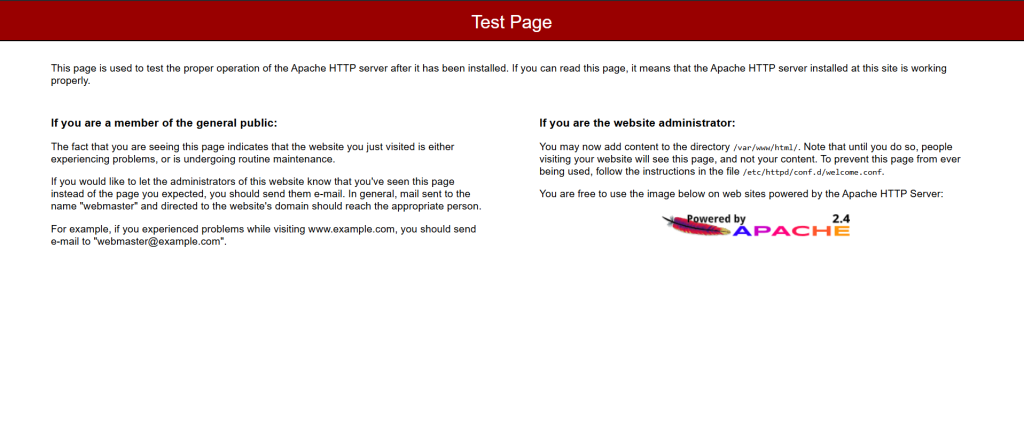
Finally, you have successfully deploy Apache webserver on AWS EC2 instance . Now, you can host your website or web application easily and quickly.

Awesome