

These days, every organization and industry wants to keep their system and applications secure, that’s why they create private network and use high security systems which is secure from third-party users or anonymous user. Similarly, AWS provide a secure virtual network known as AWS Virtual Private Cloud (VPC) service. In this blog, I will explain step by step how to create and configure a VPC in AWS.
Understanding VPC and Its Components
A Virtual Private Cloud is logically isolated and dedicate network inside AWS where you can deploy and manage EC2, storage, database and other resources. AWS provide default VPC with default subnet but we will create a custom VPC with subnets , internet gateway and route table to interact internally and externally AWS.
Key Components of VPC
- Subnet
- Subnet is a network of network it’s mean subnet is smaller segment of a VPC like public or private network.
- Public Subnet: Public subnet is connect to the internet using internet gateway.
- Private Subnet: Private subnet is just opposite of public subnet. It is mainly used for databases or backend service.
- Subnet is a network of network it’s mean subnet is smaller segment of a VPC like public or private network.
- Internet gateway
- Internet gateway is like a router. It is help to allows public subnet to communicate with the internet. you can not access public instances from the internet without using internet gateway. It is allow to inbound and outbound traffic for instances in the public subnet.
- Route Table
- Route table to allow traffic flows inside the VPC and also external network. We have to provide path for subnet to interact external and internal network. We can create two route table public and private. In public route table routes traffic using internet gateway for internet access and in private route table routes traffic within VPC but we can use NAT gateway for communicate external network.
- NAT (Network Address Translation Gateway)
- It is allow to private instances to access the internet securely. It is used for private subnet because private subnet has to access to interact with internet so if you want to downloading updates or connecting to external services while keeping instances private.
- Security Groups & NACL (Network Access Control Lists)
- SG and NACL both are firewall. They provide security at different levels. Security Groups work at the instance level controlling ingress and egress traffic per instance but NACL work at the subnet level. we can create security rules for all instance inside a subnet.
Step 1: Create a Custom VPC
you can see there are already one default VPC which is already created by AWS. So , we are create custom VPC.
- Go to AWS Console and search VPC
- Click on VPC only and enter VPC Details
- Name : MyDemoVPC
- IPv4 CIDR Block : 10.0.0.0/16
- Remaing setting leave as default
- Click create VPC

Step 2: Create Public & Private Subnets
2.1 Create Public Subnets
- Go to “Subnets” → Click “Create Subnet”
- Enter details:
- VPC:
MyDemoVPC - Subnet Name:
Public-Subnet-1 - Availability Zone:
us-east-1a - IPv4 CIDR Block:
10.0.1.0/24 - Click Create
- VPC:
✅ Repeat for Public-Subnet-2 (AZ: us-east-1b, CIDR: 10.0.2.0/24)

2.2 Create Private Subnets
✅ Repeat the above process but with:
- Private-Subnet-1 (AZ: us-east-1a, CIDR: 10.0.3.0/24)
- Private-Subnet-2 (AZ: us-east-1b, CIDR: 10.0.4.0/24)

After setting up the subnet, our subnet will look like this.
Step 3: Attach an Internet Gateway (For Public Internet Access)
- Go to “Internet Gateway” → Click “Create Internet Gateway”
- Name :
MyInternetGateway - Click Create
- Attach with MyDemoVPC

Step 4: Configure Route Tables
4.1 Create a Public Route Table
- Go to “Route Tables” → Click “Create Route Table”
- Name:
Public-Route-Table - VPC:
MyCustomVPC
- Name:
- Click Create
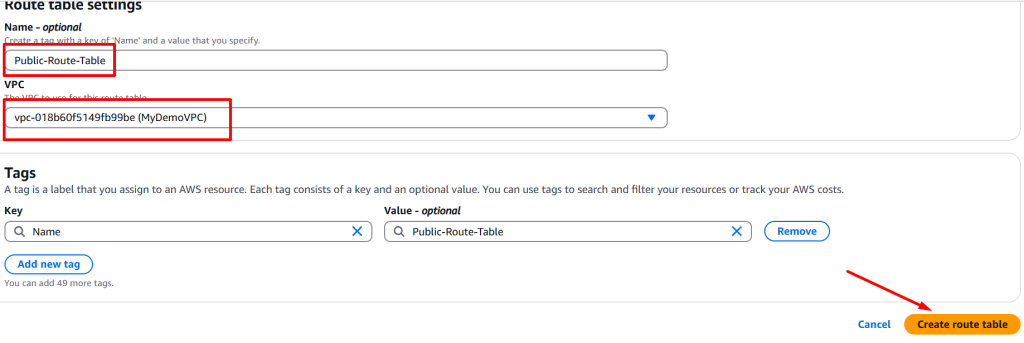
- Routes → Edit Route → Add Route
- Destination:
0.0.0.0/0(All internet traffic) - Target:
MyInternetGateway
- Destination:

- Associate with Public Subnets

4.2 Create a Private Route Table (Optional for NAT Gateway)
- Create Another Route Table (
Private-Route-Table)

- Associate It with Private Subnets

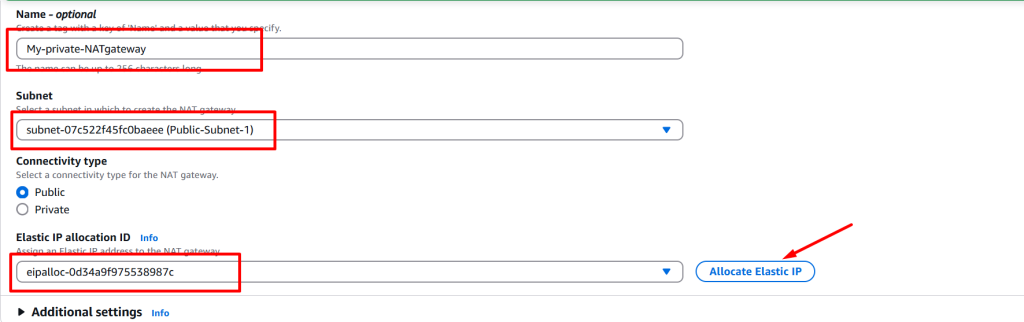
Step 5: Add a NAT Gateway (For Private Subnets) (Optional)
- Go to “NAT Gateways” → Create NAT Gateway in a Public Subnet
- Name : My-Private-NATgateway
- Subnet : Select Public Subnet
- Connectivity Type: Public
- Elastic IP Allocated ID: Click on Allocate Elastic IP
- Create NAT Gateway
- Update Private Route Table to route internet traffic via NAT
- Go back to your private route table and select attach NAT gateway same as IGW

Finally, Completed all the step to create VPC. There is only 5 step to create perfect VPC in AWS which is include VPC, Subnet, Internet Gateway, Route Table and NAT Gateway.
Good https://is.gd/N1ikS2