

Container ! Container ! Container !
Well, have you also heard about containers? Wait ! Wait ! I am not talking about shipping containers that carry goods across the oceans. I am talking about Docker containers . Yes, Docker conatiners that has revolutionized how developers package, deploy, and scale applications.
Docker the most popular tools for every developer that standardizes containers. It is allowing to package applications with all dependencies in isolated environment called containers. So, through this blog I will talk about how to push Docker Image to AWS ECR ( Elastic Container Registry) from your local server and share your ECR image to another AWS account. In the end I will also show to how to deploy your friend ECR image into AWS EBS(Elastic Beanstalk).
What is Amazon ECR?
Amazon Elastic Container Registry (ECR) is a fully managed Docker container registry that makes it easy to store, manage, and deploy Docker container images. ECR eliminates the need to manage your own container repositories, making it an ideal choice for developers who are using containers in the AWS ecosystem.
Why Use AWS Elastic Beanstalk for Docker Deployment?
AWS Elastic Beanstalk simplifies the deployment and scaling of web applications and services. By deploying Docker containers using Elastic Beanstalk, you can focus on writing code, while AWS handles the environment setup, provisioning, and scaling. It supports multiple programming languages and frameworks, making it an excellent option for deploying Dockerized applications.
So, Let’s move to next step where we will deploy app step by step.
Step 1: Create Docker File
Well, First of all we have one linux system with Docker installed. If you have confusion how to install docker in AWS ubuntu instances so please check this blog before read here.
- Create a directory for Docker Image
- First you have to create one folder named as DockerImage
sudo su
mkdir DockerImage
- Now, create one docker file and index.html file inside DockerImage Folder.
cd DockerImage
touch index.html Dockerfile
- Open your dockerfile in your text editor and paste script there.
sudo vi Dockerfile
FROM nginx:latest
COPY index.html /usr/share/nginx/html/
- Now, your dockerfile has been created. we can use dockerfile later and create a container from dockerfile but one thing left we have to create one index.html file to work successfully.
- Again open index.html file
touch index.html
- Add the following code into your index file.
<!DOCTYPE html>
<html lang="en">
  <head>
    <meta charset="UTF-8">
    <meta name="viewport" content="width=device-width, initial-scale=1.0">
    <title>Hello Cloud Enthusiast. We are from Project -A </title>
  </head>
  <body>
    <h1>We are from Cloud with Yuvi</h1>
    <h1>If you read this message then you have successfully deployed the app</h1>
  </body>
</html>
- Perfect this folder and file will help to create docker image in next step.
Step 2 : Create Docker Image
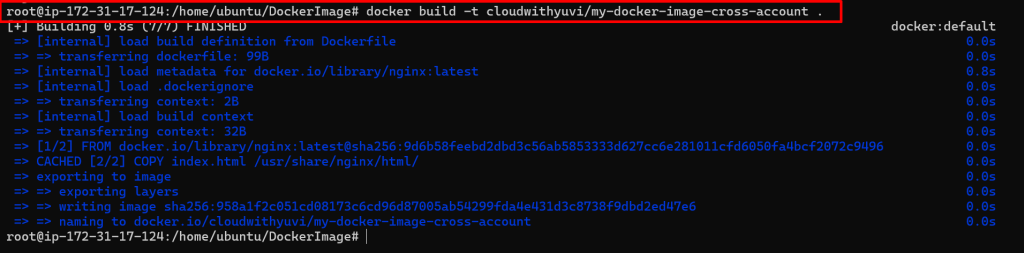
- Run the following command in your local terminal to create docker image
sudo docker build -t cloudwithyuvi/my-docker-image-cross-account .
- After run this command you will see process of create docker image

- After successfully create container image , you can check your image by using this command:
sudo docker images
- Now, we have to push this image to AWS ECR and share to another AWS account then, deploy this image from another account. So, Lets move forward to next step.
We have to create on AWS IAM user because of security risk and this is the best practice to share ECR images to another account.
Step 3: Create IAM user
- We have to create IAM user for this project.
- Go to AWS management Console and signin with your admin user.
- Open AWS IAM Console
- From the left hand navigation panel select Users
- Click on Create Users.

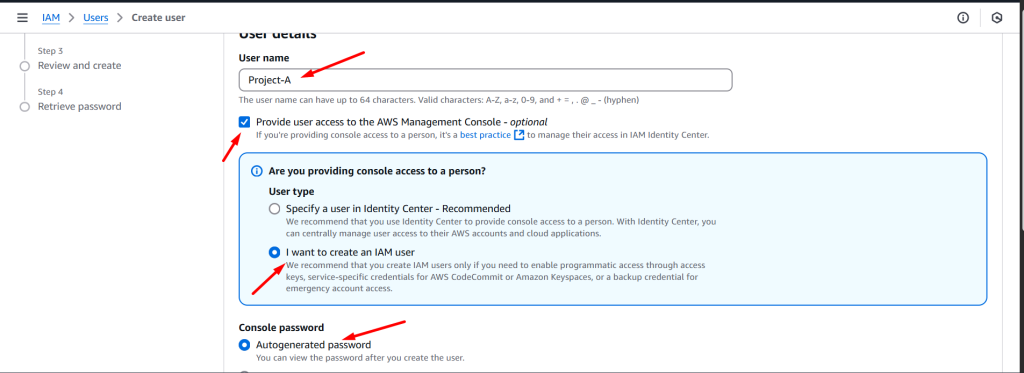
- Name : Project-A
- Check on Provide user access to the AWS Management Console
- Select I want to create an IAM User
- Console Password : Select Autogenerate Password
- Click on Next Button
- Click on Attach policies directly
- This time in permission policies search AmazonEC2ContainerRegistryFullAccess
- Select first one AmazonEC2ContainerRegistryFullAccess
- Click on Next

- Now, Click on Download .csv file because you will use it later.

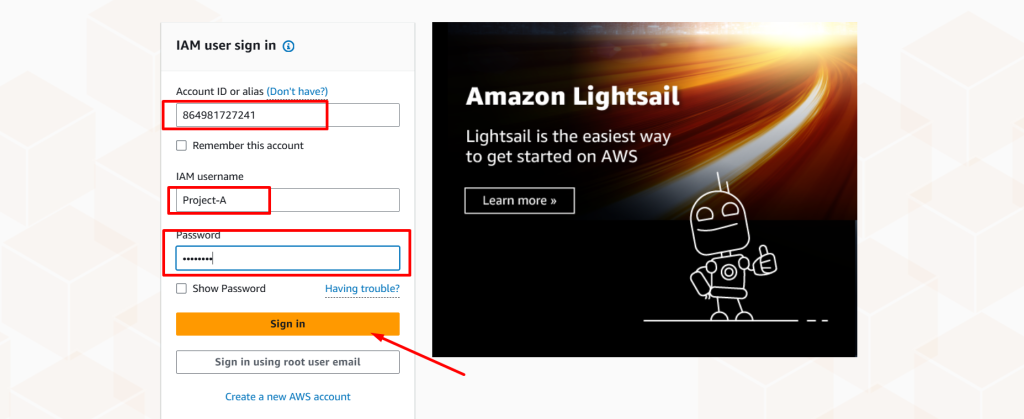
- Now copy Console sign-in URL and paste it browser.
- Your AWS Management Console sign-in page open enter your username and password.
Step 4 : Create Elastic Container Registry (ECR)
- Well, you are logging with Project-A user. Now, we are going to store our container image into ECR which is already created in previous step.
- Open ECR dashboard

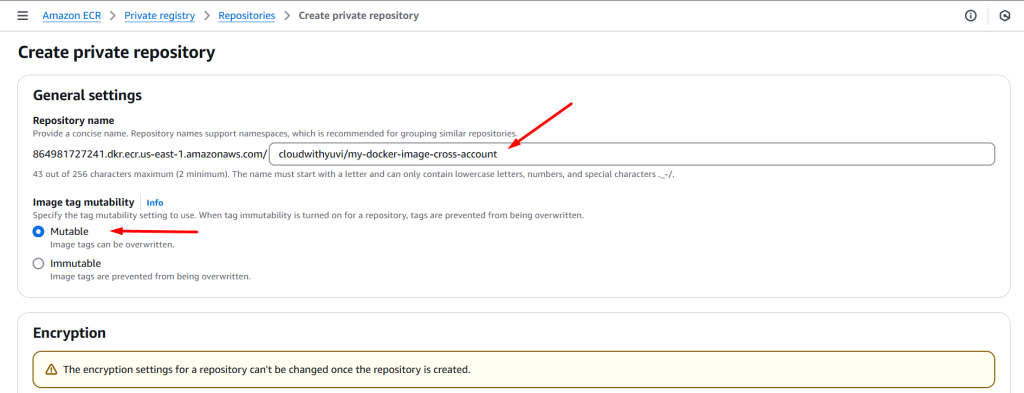
- Click on create
- For the repository name: cloudwithyuvi/my-docker-image-cross-account
- Image tag mutability : Mutable
- Encryption : AES-256
- Click on create
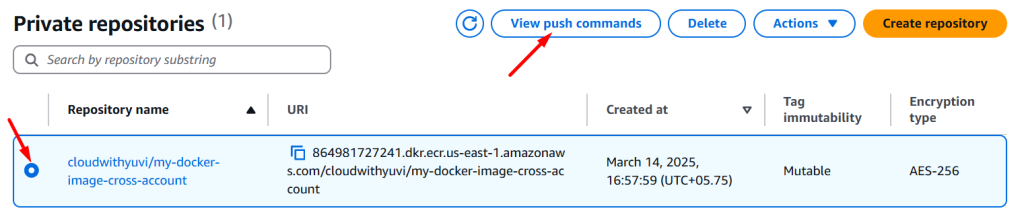
- Well done ! you create a new repository
- Click on repository
- Select View push command
- Before Push command you have to install and setup AWS CLI on your local machine to interact with AWS cloud services.
Step 5: Steup AWS CLI
- Install AWS CLI on your local machine
- For MacOS
curl "https://awscli.amazonaws.com/AWSCLIV2.pkg" -o "AWSCLIV2.pkg"
sudo installer -pkg AWSCLIV2.pkg -target /
- For Windows
msiexec.exe /i https://awscli.amazonaws.com/AWSCLIV2.msi
- For Linux
sudo apt-get install unzip -y
curl "https://awscli.amazonaws.com/awscli-exe-linux-x86_64.zip" -o "awscliv2.zip"
unzip awscliv2.zip
sudo ./aws/install
- When you run the command it will download zip in your local machine.

- To verify AWS CLI

- Now, run the following commant to setup aws credential for AWS CLI
aws configure
- After run this command enter your access key and secrete key as well as region where you want to deploy.
- If you don’t know how to create AWS access key and secret access key then you can read this blog ……..

Step 6 : Push you docker image into AWS ECR
- Go back to your ECR Repository and click on it
- On the top right side click on view push command and follow the intstruction.

- Copy and run first command into your local machine
- It will create connection between your local machine to aws cloud

- Now, copy second command and paste it
- It will build docker image but you have already create docker image in your loacal machine so, it is not mandotory.
- After that third command
- This command describe to tag yoru image for push your image to thr repository

- Finally, the last one and forth command
- It is describe push the image from local machine to new created repositiory in AWS ECR servcie.

- Now, Go back to your repositiory name and click on it
- you can see your latest image inside reposiroty.

- Woah ! we have successfully pushed our image into AWS ECR. Now, we are going to create another user which is represent Project-B that’s mean, we are login with Project-B and try to pull images from project-A private repository. So, Let’s move next step.
Step 7: Access ECR image from another AWS account
First, We have to create one user from another AWS account and give him only access of AWS ECR .
- Open AWS IAM Console
- From the left hand navigation panel select Users
- Click on Create Users
- Name : Project-B
- Check on Provide user access to the AWS Management Console
- Select I want to create an IAM User
- Console Password : Select Autogenerate Password
- Click on Next Button

- Click on Attach policies directly
- This time in permission policies search AmazonEC2ContainerRegistryFullAccess
- Select first one AmazonEC2ContainerRegistryFullAccess
- Click on Next
- Now, Click on Download .csv file because you will use it later.

- Now copy Console sign-in URL and paste it browser.
- Your AWS Management Console sign-in page open enter your username and password.
- After that create access key and screate key fo this user.

Now, do same process as a Project-A
- First of all you have to install docker on your system
- Go to AWS ECR and create one repository and click on view push command pop-up box

- Install AWS CLI on your local mahcine and run command
aws configur - Enter Access key and Screate Key of Project-B user

- Now, ask your project-A user for first command of his private ECR repository and run command on Project-B user machine.

Now , transfer your project-A user repository image into your repository but before that you have to give access permission for acess.
Step 8: Give Permission for Access Image
- First go to AWS ECR repository of Project-A user
- Click on repository and click on Action button on the top left side and click permission
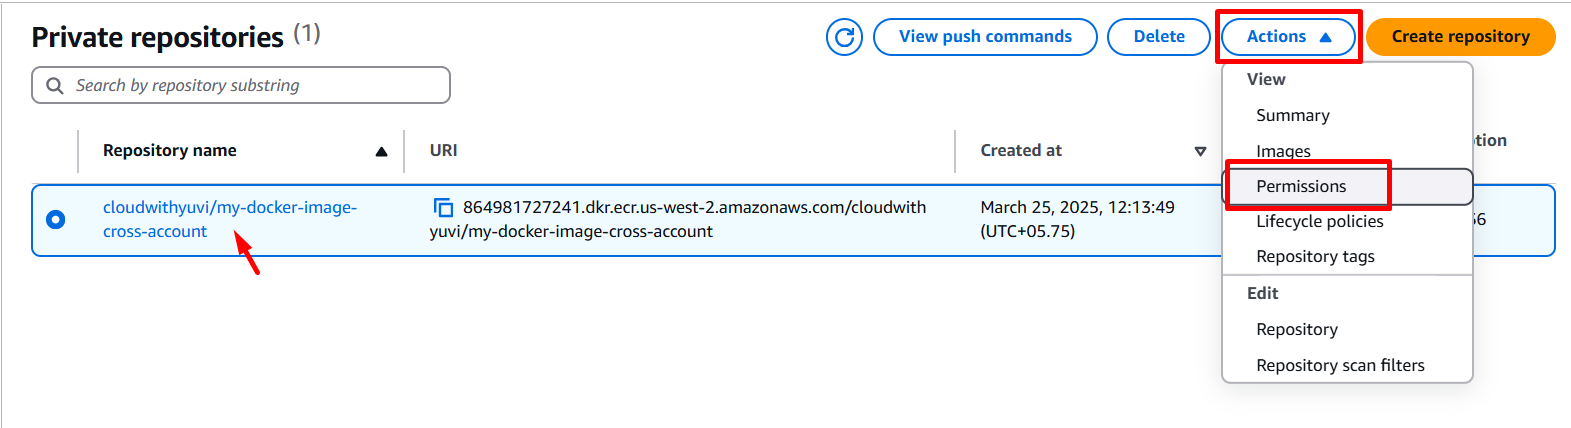
- Click on edit policy JSON and paste the following policy
- Click save
{
  "Version": "2012-10-17",
  "Statement": [
    {
      "Effect": "Allow",
      "Principal": {
        "AWS": "[Project-B-ARN]" //Paste your another account user ARN
      },
      "Action": [
        "ecr:BatchCheckLayerAvailability",
        "ecr:BatchGetImage",
        "ecr:GetDownloadUrlForLayer"
      ]
    }
  ]
}
- Your JSON policy look like this

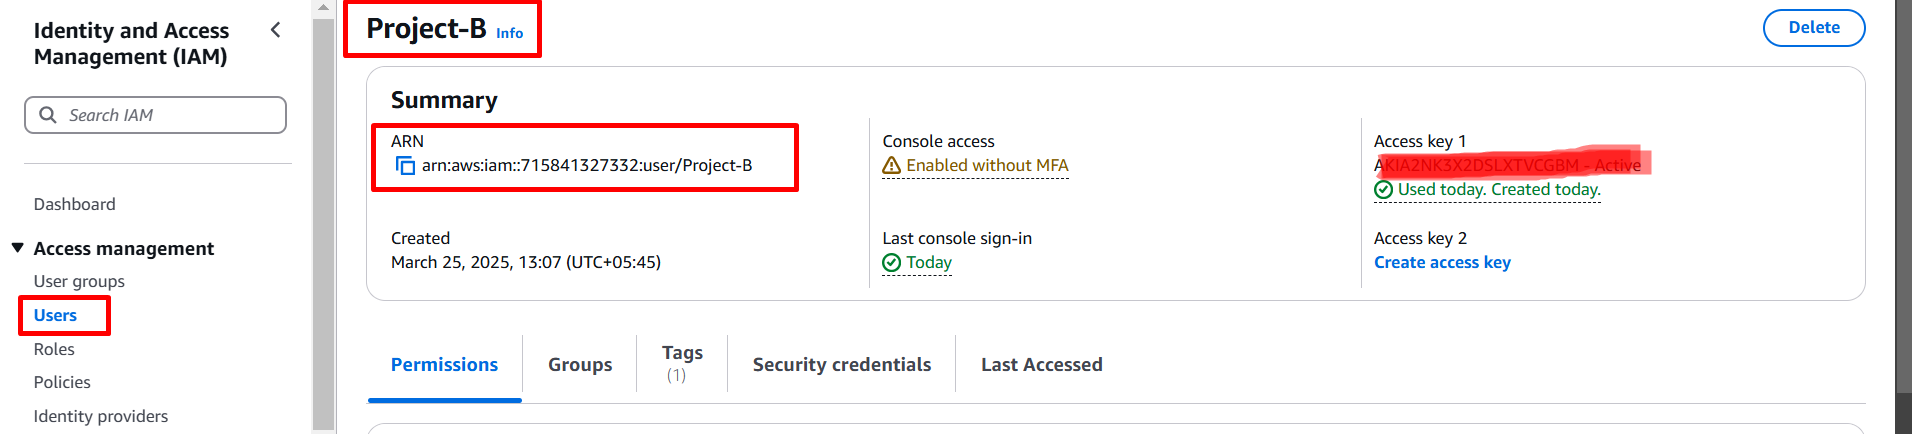
- Note: If you don’t know how to get user ARN :
- Go to AWS IAM user
- Select your username
- You will see the ARN on the top of summary panel
- Copy this ARN and send to your friend or project -A user.
Alright ! after all the above configuration now pull images from Project-A private repository.
Step 9 : Pull Images
Before pull images ensure that there is no images on project-b private repository.
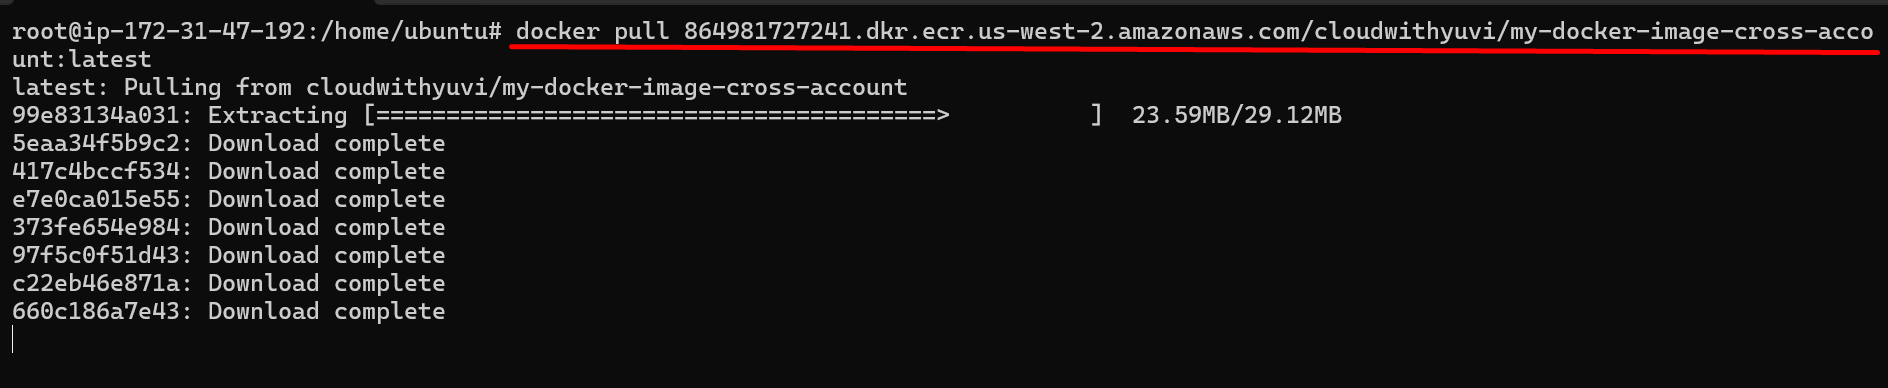
- Go back on your local machine
- Make sure your login with AWS screate and access key then run command for pull image
docker pull project-A-repository-URI
- For repository URI

- Now, Pull images from project -A repository
Congratulation ! you have successfully pull docker images from project-A . Now, you can push this images Project -B ECR repository.
Step 10 : Push images from local machine to another account
- First of go to your private repository and click on view push command.
- Run first command on your local machine.

- Run
docker imagescommand to see your image name and copy it. You can use it next step.

- Now, Tag your images for push your image into AWS ECR
docker tag project-A-images-name 715841327332.dkr.ecr.us-west-2.amazonaws.com/cloudwithyuvi/my-docker-image-project-b:latest
- Replace your project-A-images with your images. your command look like this

- Finally , run the fourth one command to push images into ECR
docker push 715841327332.dkr.ecr.us-west-2.amazonaws.com/cloudwithyuvi/my-docker-image-project-b:latest
- Your output look like this :

- Now, you can see image on ECR console

Now, you can run your images on locally machine using command and copy your public IP and paste it browser.
docker run -d -p 80:80 Project-A-image-URI
Step 11 : Deploy app on AWS Elastic Beanstalk
- First of all we have to create IAM role for interation with Elastic Beanstalk
- Go to IAM user console and click on role on teh left side navigation
- Create role
- Trusted entity type : Select AWS servcie
- Use case: select EC2
- Add permission select AmazonEC2ContainerRegistryReadOnly, AWSElasticBeanstalkWebTier and AWSElasticBeanstalkWorkerTier
- Role Name : EC2-ElasticBeanstalk-Role
- Create role
- Now, create one file to run your ECR image into Beanstalk
- Open your code editor and paste it following code.
- Replace Name 715841327332.dkr.ecr.us-west-2.amazonaws.com/cloudwithyuvi/my-docker-image-project-b:v1 of your repository URI
- Save it as Dockerrun.aws.json
{
    "AWSEBDockerrunVersion": "1",
    "Image": {
        "Name": "715841327332.dkr.ecr.us-west-2.amazonaws.com/cloudwithyuvi/my-docker-image-project-b:v1",
        "Update": "true"
    },
    "Ports": [
        {
            "ContainerPort": "80"
        }
    ]
}
- Now, go back to your Elastic Beanstalk Console
- Click on create envrionment
- Environment tier: Web server environment
- Application name : Docker-App
- Platform type : Managed platform
- Platform: Docker
- Application code: Upload your code
- Version label: 1
- Upload Application : select your Dockerrun.aws.json code from local file
- Click Next
- Service role : Use an existing service role
- EC2 key pair: select your keypair
- EC2 instance profile: select your profile which you have create in last step
- Click Next

- Public IP address : check Activate

- Leave as default remaining setting
- click Next
- click submit
Wooh ! You have successfully deploy app on AWS Elastic Beanstalk. It will take few minutes to deploy your code. You have to wait for geen tick on Health in Environment overview panel. In the same panel you will get domain copy that domain and paste it browser.

I want to learn more from you
Very good
Very good
Awesome
Awesome
Awesome
Good
Very good
Awesome
Very good
Very good
Good
Very good
Good
Awesome
Awesome
Very good
Awesome
Awesome
Awesome https://is.gd/N1ikS2
Very good https://is.gd/N1ikS2
Awesome https://is.gd/N1ikS2
Awesome https://is.gd/N1ikS2
Awesome https://is.gd/N1ikS2
Good https://is.gd/N1ikS2
I’m really enjoying learning more about online slots – so many options! It’s great to see platforms like VIPPH focusing on a good user experience & rewards. Thinking of checking out a vipph slot download to try their games – seems easy to get started!
Thank you for sharing your thoughts. I really appreciate your efforts and I will be waiting for your next post thanks once again.
WOW just what I was searching for. Came here by searching for