

Introduction
Deploying monolithic applications like WordPress into microservice architectures requires robust container orchestration to achieve enterprise-grade availability, auto-scaling, and failover support. While traditional single-server installations introduce single points of failure, containerizing WordPress with Docker, hosting images in Amazon Elastic Container Registry (ECR), and orchestrating worker nodes via Amazon Elastic Kubernetes Service (EKS) delivers a fault-tolerant cloud platform.
In this comprehensive production guide, we will containerize WordPress and MySQL, build local Docker images, push production artifacts to Amazon ECR repositories, provision an Amazon EKS cluster with AWS EBS CSI storage drivers, and deploy stateful Kubernetes manifests.
Prerequisites
Before starting, make sure you have:
- An AWS Account
- AWS CLI configured (
aws configure) - Docker installed
kubectlinstalled and configuredeksctlinstalled- Basic knowledge of Docker and Kubernetes
Step 1: Containerize WordPress & MySQL with Docker Compose
First, construct local Docker environment manifests to verify database connections before pushing to AWS ECR:
- Create Dockerfile for setup WordPress

- Create a Dockerfile for WordPress Mysql
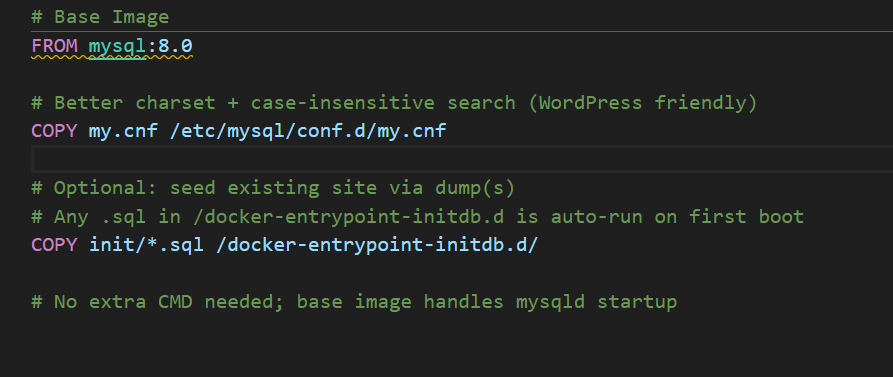
- Create a root project directory containing a
docker-compose.ymlfile
version: '3.8'

services:
  db:
    build: ./backend
    image: local/wp-backend:latest
    container_name: wp-db
    environment:
      MYSQL_DATABASE: ${DB_NAME}
      MYSQL_USER: ${DB_USER}
      MYSQL_PASSWORD: ${DB_PASSWORD}
      MYSQL_ROOT_PASSWORD: ${DB_ROOT_PASSWORD}
    volumes:
      - db_data:/var/lib/mysql
    healthcheck:
      test: ["CMD", "mysqladmin", "ping", "-h", "localhost", "-p${DB_ROOT_PASSWORD}"]
      interval: 10s
      timeout: 5s
      retries: 5

  wordpress:
    build: ./frontend
    image: local/wp-frontend:latest
    container_name: wp-frontend
    depends_on:
      db:
        condition: service_healthy
    environment:
      WORDPRESS_DB_HOST: db:3306
      WORDPRESS_DB_USER: ${DB_USER}
      WORDPRESS_DB_PASSWORD: ${DB_PASSWORD}
      WORDPRESS_DB_NAME: ${DB_NAME}
    ports:
      - "8080:80"
    volumes:
      - wp_data:/var/www/html

volumes:
  db_data:
  wp_data:
- Now, Build Images using docker compose
Multi Copy Code Blocks
docker compose up -d --build

- Visit
http://localhost:8080in your web browser to confirm local setup health.

Step 2: Provision ECR Repositories & Push Container Images
Next, create private Amazon ECR repositories, authenticate your local Docker daemon, tag your built images, and push them to AWS:
- Set environmental variables for your AWS Region and Account ID:
export AWS_REGION="ap-south-1"
export AWS_ACCOUNT_ID=$(aws sts get-caller-identity --query Account --output text)
- Provision ECR repositories for both frontend and backend workloads:
# For WordPress
aws ecr create-repository --repository-name wp-frontend --region $AWS_REGION

# For Mysql
aws ecr create-repository --reposiroty-name wp-backend --region $AWS_REGION

- Authenticate Docker against your private AWS ECR registry:
Multi Copy Code Blocks
aws ecr get-login-password -–region $AWS_REGION | docker login --username AWS --password-stdin ${AWS_ACCOUNT_ID}.dkr.ecr.${AWS_REGION}.amazonaws.com
- Tag and push both local container images to Amazon ECR:
Multi Copy Code Blocks
# Tag Local Images to ECR Format

docker tag cloudwithyuvi/wp-frontend:latest ${AWS_ACCOUNT_ID}.dkr.ecr.${AWS_REGION}.amazonaws.com/wp-frontend:latest

docker tag cloudwithyuvi/wp-backend:8.0 ${AWS_ACCOUNT_ID}.dkr.ecr.${AWS_REGION}.amazonaws.com/wp-backend:8.0

# Push the Image to ECR

docker push ${AWS_ACCOUNT_ID}.dkr.ecr.${AWS_REGION}.amazonaws.com/wp-frontend:latest

docker push ${AWS_ACCOUNT_ID}.dkr.ecr.${AWS_REGION}.amazonaws.com/wp-backend:8.0

Step 3: Provision Amazon EKS Cluster & Storage Driver
Now, initialize a managed Kubernetes cluster using eksctl and enable the AWS EBS CSI driver for persistent block storage:
- Install kubectl
Multi Copy Code Blocks
curl -o kubectl https://amazon-eks.s3.us-west-2.amazonaws.com/1.30.0/2024-06-14/bin/linux/amd64/kubectl
chmod +x ./kubectl
sudo mv ./kubectl /usr/local/bin

kubectl version --client
- Install eksctl
Multi Copy Code Blocks
curl --silent --location "https://github.com/eksctl-io/eksctl/releases/latest/download/eksctl_$(uname -s)_amd64.tar.gz" | tar xz -C /tmp
sudo mv /tmp/eksctl /usr/local/bin

eksctl version
- Create role for EKS
- Go to AWS Console > IAM > Roles
- Select Use case EC2 and attach Policy
AmazonEKSWorkerNodePolicy, AmazonEC2ContainerRegistryReadOnly, AmazonEKS_CNI_Policyand provide role name EKSNodeRole
- Provision a 2-node managed Amazon EKS cluster:
eksctl create cluster \
  --name wordpress-cluster \
  --region ap-south-1 \
  --nodegroup-name wordpress-nodes \
  --node-type t3.medium \
  --nodes 2 \
  --nodes-min 2 \
  --nodes-max 4 \
  --managed
Note : It will take few minutes to create AWS EKS Cluster. You can take a tea break. 😂😂

- Configure local
kubectlcontext to connect to your new EKS cluster:
aws eks --region ap-south-1 update-kubeconfig --name wordpress-cluster
- Create IAM service accounts and attach the EBS CSI Driver add-on for dynamic volume provisioning:
eksctl create iamserviceaccount \
  --name ebs-csi-controller-sa \
  --namespace kube-system \
  --cluster wordpress-cluster \
  --attach-policy-arn arn:aws:iam::aws:policy/service-role/AmazonEBSCSIDriverPolicy \
  --approve \
  --role-only \
  --role-name AmazonEKS_EBS_CSI_DriverRole

aws eks create-addon \
  --cluster-name wordpress-cluster \
  --addon-name aws-ebs-csi-driver \
  --service-account-role-arn arn:aws:iam::${AWS_ACCOUNT_ID}:role/AmazonEKS_EBS_CSI_DriverRole
- Verifying driver
kubectl get pods -n kube-system | grep ebs
- To check and verifying nodes
kubectl get nodes

Step 4: Deploy Stateful Kubernetes Manifests & Secrets
Finally, deploy isolated namespace resources, persistent volumes, database secrets, and load balancer services:
- Create a unified Kubernetes manifest file (
wordpress-k8s-manifest.yaml):
apiVersion: v1
kind: Namespace
metadata:
  name: wordpress
---
apiVersion: v1
kind: Secret
metadata:
  name: wp-db-password
  namespace: wordpress
type: Opaque
stringData:
  db-password: wpproductionpassword
  root-password: rootsecretpassword
---
apiVersion: v1
kind: PersistentVolumeClaim
metadata:
  name: mysql-pv-claim
  namespace: wordpress
spec:
  accessModes:
    - ReadWriteOnce
  resources:
    requests:
      storage: 20Gi
  storageClassName: gp2
---
apiVersion: v1
kind: PersistentVolumeClaim
metadata:
  name: wp-pv-claim
  namespace: wordpress
spec:
  accessModes:
    - ReadWriteOnce
  resources:
    requests:
      storage: 20Gi
  storageClassName: gp2
---
apiVersion: apps/v1
kind: Deployment
metadata:
  name: mysql
  namespace: wordpress
spec:
  selector:
    matchLabels:
      app: mysql
  strategy:
    type: Recreate
  template:
    metadata:
      labels:
        app: mysql
    spec:
      containers:
      - image: ACCOUNT_ID.dkr.ecr.ap-south-1.amazonaws.com/wp-backend:latest
        name: mysql
        env:
        - name: MYSQL_ROOT_PASSWORD
          valueFrom:
            secretKeyRef:
              name: wp-db-password
              key: root-password
        - name: MYSQL_DATABASE
          value: wordpress
        - name: MYSQL_USER
          value: wpuser
        - name: MYSQL_PASSWORD
          valueFrom:
            secretKeyRef:
              name: wp-db-password
              key: db-password
        ports:
        - containerPort: 3306
          name: mysql
        volumeMounts:
        - name: mysql-persistent-storage
          mountPath: /var/lib/mysql
      volumes:
      - name: mysql-persistent-storage
        persistentVolumeClaim:
          claimName: mysql-pv-claim
---
apiVersion: v1
kind: Service
metadata:
  name: mysql
  namespace: wordpress
spec:
  ports:
    - port: 3306
  selector:
    app: mysql
  clusterIP: None
---
apiVersion: apps/v1
kind: Deployment
metadata:
  name: wordpress
  namespace: wordpress
spec:
  replicas: 2
  selector:
    matchLabels:
      app: wordpress
  template:
    metadata:
      labels:
        app: wordpress
    spec:
      containers:
      - image: ACCOUNT_ID.dkr.ecr.ap-south-1.amazonaws.com/wp-frontend:latest
        name: wordpress
        env:
        - name: WORDPRESS_DB_HOST
          value: mysql.wordpress.svc.cluster.local:3306
        - name: WORDPRESS_DB_USER
          value: wpuser
        - name: WORDPRESS_DB_PASSWORD
          valueFrom:
            secretKeyRef:
              name: wp-db-password
              key: db-password
        - name: WORDPRESS_DB_NAME
          value: wordpress
        ports:
        - containerPort: 80
        volumeMounts:
        - name: wp-persistent-storage
          mountPath: /var/www/html
      volumes:
      - name: wp-persistent-storage
        persistentVolumeClaim:
          claimName: wp-pv-claim
---
apiVersion: v1
kind: Service
metadata:
  name: wordpress-service
  namespace: wordpress
spec:
  type: LoadBalancer
  ports:
    - port: 80
  selector:
    app: wordpress
- Replace
ACCOUNT_IDin the manifest with your actual AWS Account ID and apply the configuration:
kubectl apply -f wordpress-k8s-manifest.yaml
- Retrieve the active Application Load Balancer endpoint to access your live WordPress site:
kubectl get svc -n wordpress wordpress-service -o jsonpath='{.status.loadBalancer.ingress[0].hostname}'
- Copy the external IP for run your website on browser
kubectl get svc -n wordpress

If all are running status then copy the External IP of wordpress-service and paste it on your browser.

Stateful Workload & Storage Safeguards in Kubernetes:
- EBS CSI Driver Requirement: Without the
aws-ebs-csi-driverinstalled, your Persistent Volume Claims (PVC) will remain permanently stuck in thePendingstate, preventing pod scheduling.
- ReadWriteOnce Access Modes: AWS EBS volumes can only be attached to a single AWS EC2 instance at a time (
ReadWriteOnce). For multi-node WordPress autoscaling with shared media uploads, consider utilizing Amazon EFS (Elastic File System) instead of EBS.
Production Troubleshooting: Common EKS & ECR Deployment Errors
Deploying stateful microservices to Kubernetes requires monitoring volume attachments and image credentials. Use this matrix to debug common runtime failures:
Error 1: PersistentVolumeClaim Stuck in Pending State
- The Error Log (
kubectl describe pvc -n wordpress):
Events:
  Type     Reason              Age   From                         Message
  Warning  ProvisioningFailed  1m    ebs.csi.aws.com_controller   storageclass.storage.k8s.io "gp2" not found / waiting for first consumer
- The Root Cause: The AWS EBS CSI Controller addon is either not installed or lacks necessary IAM execution permissions via OIDC.
- The Fix: Verify that
AmazonEKS_EBS_CSI_DriverRoleis attached to your cluster service account as shown in Step 3.
Error 2: Pod Status Shows ImagePullBackOff or ErrImagePull
- The Error Log (
kubectl get pods -n wordpress):
NAME                        READY   STATUS             RESTARTS   AGE
wordpress-685794698-x29lp   0/1     ImagePullBackOff   0          2m
- The Root Cause: The node IAM role lacks access to ECR, or the image tag/path specified in the deployment YAML does not match the actual ECR repository path.
- The Fix: Attach
AmazonEC2ContainerRegistryReadOnlypolicy to your EKS Node Group IAM Role or verify the image string format:${AWS_ACCOUNT_ID}.dkr.ecr.${AWS_REGION}[.amazonaws.com/wp-frontend:latest](https://.amazonaws.com/wp-frontend:latest).
Error 3: Database Connection Error on WordPress Screen
- The Error Log (Container Logs):
Error establishing a database connection.
- The Root Cause: The WordPress pod cannot resolve the headless MySQL service name (
mysql.wordpress.svc.cluster.local) or database password credentials inwp-db-passwordsecret are mismatched. - The Fix: Run
kubectl get svc -n wordpressto verify that the headlessmysqlservice port 3306 is active and correctly labeled.

